
How to Prepare Videos for Localization: A Practical Production Checklist
Table of Contents
You’ve finished editing a video, exported the final MP4, and published it. Six months later, you decide to create a dubbed version for another audience. The original voice is mixed with background music. Several titles are embedded in the footage. The editing project is still somewhere on an old drive, but some of its linked files are missing. The video can still be localized. The trouble is that changes that once took a few minutes may now require rebuilding parts of the edit.
Learning how to prepare videos for localization can help you avoid these problems without changing the way you create content. A few decisions about what to save, how to organize it, and which elements to keep editable can make future language versions easier to produce. You don’t need a professional studio or a complicated asset-management system. You also don’t need to know which languages you’ll eventually target. The aim is to preserve useful options while you’re still working with the original material.
What Makes a Video Easier to Localize Later?
A video is easier to localize when the elements that may need changing are still accessible. Think about a typical tutorial. It might contain spoken instructions, background music, animated titles, screenshots, captions, and a closing message. Some of those elements can remain unchanged in another language. Others may need to be translated, rerecorded, replaced, or adjusted to fit the new version.
If everything exists only inside one exported video file, making those changes becomes more difficult. The editor may have to recreate graphics, extract dialogue from a mixed soundtrack, or reconstruct timing information that was available in the original project. A localization-ready video doesn’t require every element to be separated into its own file. It means you’ve retained enough of the original materials to make likely changes without unnecessary reconstruction.
The amount of preparation depends on the content. A talking-head video with few graphics has different requirements from an animated explainer with dozens of text labels. A tutorial that only needs subtitles may require fewer assets than a documentary being fully dubbed.
The distinction between subtitles, voice-over, and dubbing matters here because each approach places different demands on the original material. Rather than trying to prepare for every possible scenario, start by keeping the files that would be hardest to recreate.
Keep the Source Files That Give You Options
If you’re wondering how to prepare videos for localization, keeping your original project files and source materials is one of the most practical places to start. The final MP4 is designed for viewing and distribution. It usually doesn’t preserve the editing flexibility of the original project. If you still have the source materials, future editors can make changes directly instead of working around elements that have already been combined.
Which source files should you save?
The following assets are particularly useful when preparing videos for localization.
Source asset | Why it helps later |
Editable project file | Allows editors to adjust timing, replace assets, and revise the original edit |
Original video footage | Provides flexibility for alternate cuts, replacements, and reframing |
Original dialogue or narration recordings | Makes it easier to work with speech independently of the finished soundtrack |
Separate music and sound effects | Helps preserve the original sound design when replacing speech |
Script or transcript | Provides a reference for translation, subtitles, and review |
Editable graphics and titles | Allows on-screen text to be translated without recreating the design |
Linked images, fonts, and other assets | Helps reproduce graphics and reopen the project correctly |
Clean master export | Provides a version without certain embedded elements that may need replacing |
You won’t need every item for every project. If a video contains no spoken dialogue, separate narration recordings may be irrelevant. If there are no on-screen graphics, editable title files won’t matter. For most creators, preserving the editing project and its linked assets is a sensible starting point.
Make sure your project files can actually be reopened
Saving the project file alone may not be enough. Video editing applications often reference footage, audio, images, and fonts stored elsewhere on your computer. If those files are moved or deleted, the project may open with missing-media warnings.
Before archiving a finished video, check that the project can still locate its important assets. Where your editing software supports collecting, consolidating, or packaging project media, that feature can help. Also consider whether the project depends on plugins, templates, or fonts that might not be available later.
You don’t have to preserve an entire editing workstation indefinitely. But a project archive that contains the files needed to reproduce the edit is considerably more useful than a project file that no longer connects to its media.
Keep Dialogue, Music, and Sound Effects Separate
When learning how to prepare videos for localization, audio is one of the most important elements to consider, especially if dubbing or voice-over may be part of your future plans. Imagine a cooking tutorial in which the presenter explains a recipe while music plays quietly underneath. In the finished export, both sounds are combined into the same audio mix.
If you later replace the English narration with Spanish, the original narration needs to be removed or reduced without damaging the music. When the two elements are available separately, the editor can work with the narration and soundtrack independently. When they exist only as a combined recording, the task becomes more complicated.
What are audio stems?
An audio stem is an exported audio file containing a particular group of sounds from the project. Depending on the video, useful stems might include:
- Dialogue or narration: The original spoken audio.
- Music: Background music, themes, or other musical elements.
- Sound effects and ambience: Effects, environmental sounds, and other non-dialogue audio.
For projects with more complex sound design, these categories may be divided further. A related deliverable is the music and effects (M&E) track, which contains the music and sound effects without the original dialogue. A suitable M&E track can help a dubbing team replace speech while preserving the rest of the soundtrack.
However, not every video has a clean M&E track available. Music may have been recorded in the same room as the speaker, for example, or environmental sounds may be inseparable from the original dialogue recording. Separate stems are useful whenever the source material allows them. They aren’t a guarantee that every sound can be isolated perfectly.
What if the audio is already mixed?
A video with mixed audio can still be localized. Audio separation and restoration techniques may help isolate speech or reduce the original voice. Editors can also rebuild parts of a soundtrack when the necessary material is available.
The results depend on the recording. Overlapping voices, reverberation, loud music, and background noise can make clean separation difficult. Processing may also introduce audible artifacts. That’s why retaining the original recordings and separate audio elements is preferable when possible. It gives future editors more control and reduces the need to recover sounds from a finished mix. For creators considering professional dubbing, these materials can make it easier for a dubbing production team to assess the project and work with the existing soundtrack.
Save Scripts, Transcripts, and Terminology
Knowing how to prepare videos for localization also means preserving an accurate written record of what was said. A finished video contains the words viewers hear, but it doesn’t necessarily provide that record.
Keep the final script, not just the first draft
If you work from a script, save the version that reflects what was actually recorded. Presenters often change wording during recording. They may add an explanation, skip a sentence, or use a different term from the one in the original draft. A translator working from an outdated script could produce text that no longer matches the finished video. For heavily scripted content, keeping the approved script alongside the final video is usually straightforward. For spontaneous content, an accurate transcript may be more useful.
Know the difference between a script and a transcript
A script describes what was intended to be said. A transcript records what was actually spoken. Both can support localization, but they aren’t interchangeable.
If a video includes interviews, unscripted conversations, or improvised commentary, a transcript provides a closer reference to the final recording. It can also help identify speaker changes and passages that may require additional context.
An automatically generated transcript can be a useful starting point, especially for long videos. It should still be checked where accuracy matters, particularly for names, technical terms, numbers, and speech that the software may have misheard.
Timecoded transcripts can offer additional value because they connect the spoken text to positions in the video. That information may reduce the effort required to prepare subtitles or align translated dialogue. You don’t need to create a perfectly formatted transcript for every casual upload. Keeping a reliable text reference for videos you expect to localize is a practical improvement.
Preserve terminology and pronunciation notes
Understanding how to prepare videos for localization goes beyond preserving technical assets. A software tutorial may mention product features with unusual names. A science video may use abbreviations that have several meanings. An interview might refer to people, places, or organizations whose names are unfamiliar to someone outside the original audience.
A short terminology document can prevent avoidable confusion. It might include approved product names, technical terms, abbreviations, pronunciation guidance, and brief explanations of references that could otherwise be misunderstood.
For a channel producing a continuing series, maintaining these notes over time can also improve consistency between episodes and future language versions. There’s no need to turn every video into a documentation project. Start with the terms that are important, repeated, or likely to be misinterpreted.
Make On-Screen Text Easy to Replace
Not all language-dependent information is spoken. Tutorials may contain instructions inside screenshots. Business videos often use charts and labels. Educational content may rely on diagrams, captions, and animated titles to explain important ideas. If these elements are embedded permanently into the finished image, replacing them later can require additional editing.
Keep text editable whenever practical
Suppose an explainer video contains an animated title reading “Three Common Mistakes.” If that title remains an editable text layer, an editor can replace it with a translation and adjust the layout. If it exists only as part of a flattened image or rendered video, the editor may need to recreate the graphic. The same applies to lower thirds, callouts, diagrams, and other text-based visual elements.
Keeping the original design files is often enough. You don’t need to create multilingual graphics before you have decided to localize the video. When working with screenshots or screen recordings, the situation is less straightforward. Text may be part of the software interface itself. Replacing it could require a new recording, a localized interface, or carefully edited visual elements. The right approach depends on how important the on-screen information is to understanding the video.
Leave room for translated text
Translations don’t always occupy the same amount of space as the original wording. A short English button label may become longer in another language. An animated title designed to fit a narrow area may need a smaller font, a wider text box, or a different line break.
When you’re already designing graphics, a little layout flexibility can help. Avoid making every text element fit so tightly that changing the wording requires rebuilding the entire composition. This doesn’t mean leaving large empty spaces everywhere. It means keeping the design adjustable. Editable text boxes, flexible layouts, and access to the original fonts or design assets are more useful than trying to predict the exact length of every future translation.
Don’t remove visual details that make the content distinctive
Creators sometimes worry that preparing for localization means avoiding culturally specific references, humor, or visual personality. It doesn’t. If a joke, handwritten note, or unusual graphic is important to the video, keep it. The future localization team can decide whether it needs translation, adaptation, explanation, or no change at all. Your responsibility during production is simply to preserve the materials and context that make those decisions possible.
Preserve a Clean Master and Organize Versions
A clean master is a version of the finished video that leaves certain elements available for replacement rather than permanently embedding them in the image or soundtrack. The exact meaning depends on the project.
For a subtitled video, a clean master may be an export without burned-in captions. For a video containing localized titles, it may be useful to retain a version without those titles. For dubbing, separate audio materials are often more important than a text-free picture. You don’t need to export every imaginable variation. Save the versions that would be difficult to recreate and are likely to help with future changes.
Use file names that tell you what you’re opening
When a project contains only a handful of files, names such as final.mp4 and final_new.mp4 may seem manageable. That becomes confusing when you revisit the project months later or begin producing several language versions. A simple naming convention can identify the video, language, asset type, and version. For example:
File | Example name |
Original video master | camera-tutorial_en_master_v01.mp4 |
Clean master | camera-tutorial_clean-master_v01.mp4 |
English transcript | camera-tutorial_en_transcript_v01.docx |
Dialogue stem | camera-tutorial_en_dialogue_v01.wav |
Music and effects | camera-tutorial_me_v01.wav |
Editable graphics | camera-tutorial_graphics_source |
These names are examples, not a required standard. The important part is consistency. Your future self, an editor, or a localization partner should be able to understand what a file contains without opening several versions to find out.
Keep the folder structure simple
When considering how to prepare videos for localization, organizing your source assets into a clear folder structure is just as important as deciding which files to preserve. The example below shows how these assets can be organized within one video project, with separate space for original materials and future localized versions.
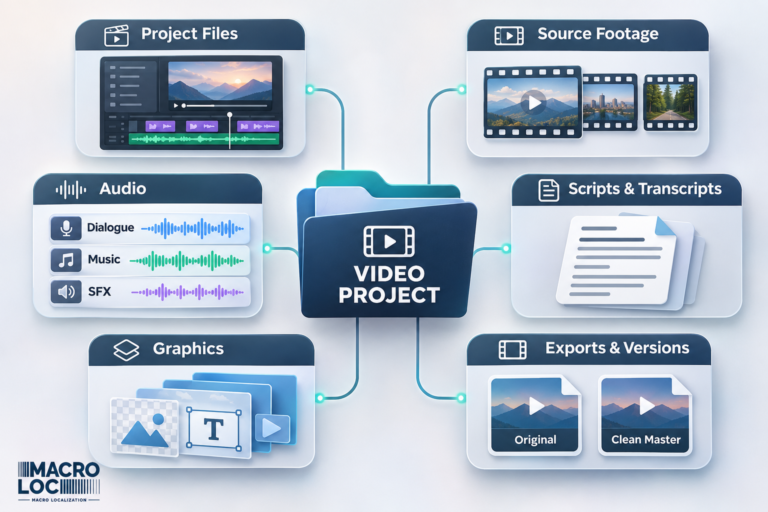
You can simplify this structure for smaller projects or expand it when production becomes more complex. The folder names themselves aren’t especially important. What matters is keeping related files together so essential assets are easy to find when you need them again.
Don’t forget backups and version control
A well-organized project is still vulnerable if it exists in only one place. Keep backup copies of important source materials, particularly files that cannot be recreated easily. For ongoing work, make sure you can distinguish approved versions from drafts and older exports. You don’t need enterprise-level version-control software to do this. A consistent file-naming system, reliable backups, and a clear place for approved assets may be sufficient for an independent creator. As your library grows, these habits become more valuable. They also reduce the chances of a future language version being produced from an outdated script or incorrect master.
What If You Only Have the Finished Video?
Many creators begin thinking about localization after publishing their videos. Perhaps the original project files were deleted to save space. Maybe an external editor handled the production and delivered only the finished export. Or the video was created years ago using software you no longer have. These situations can make localization more complicated, but they don’t necessarily prevent it. A finished video can still provide the source for transcription, translation, subtitling, and other localization work. Depending on the required result, editors may also be able to separate audio, recreate graphics, or adjust visual elements. The trade-off is usually additional effort and less flexibility.
What can still be done with an MP4?
If you’re trying to understand how to prepare videos for localization but only have the finished MP4, the process starts with identifying which elements can still be recovered or recreated. If the video contains clear speech, a transcript can be created from the finished recording. That transcript can then support translation and subtitle preparation. For voice-over or dubbing, the original dialogue may need to be separated from the soundtrack. If clean separation isn’t possible, parts of the audio may have to be rebuilt or replaced.
On-screen text can sometimes be covered, recreated, or replaced through editing. The difficulty depends on whether the text appears over a simple background, moving footage, or detailed animation. A short title on a plain background is relatively straightforward to reproduce. A paragraph embedded in a moving 3D scene presents a very different challenge.
How to Prepare Videos for Localization Without Original Project Files
First, identify which elements actually need changing. If your goal is to add subtitles, missing editable graphics may not matter. If you want a fully dubbed version with translated on-screen instructions, the condition of the audio and graphics becomes much more important. Next, gather whatever supporting material still exists. Old scripts, presentation slides, original images, or separate audio recordings may be useful even when the editing project is unavailable.
Finally, be clear about what you can provide. A localization team can assess the available materials and explain which parts of the work may require reconstruction. Don’t delay a worthwhile localization project simply because your archive is incomplete. Treat the missing assets as production constraints to evaluate.
How to Prepare Videos for Localization: A 3-Stage Production Checklist
You don’t need to complete every item before publishing a video. Use this checklist to identify practical improvements for your own workflow.
Before recording
- Save the working script or outline if one exists.
- Identify important terminology, names, and abbreviations.
- Consider whether any essential information appears only in spoken dialogue or on-screen text.
- Keep your intended audience in mind without changing your creative style unnecessarily.
During recording and editing
- Preserve original footage and audio recordings where practical.
- Keep dialogue separate from music and sound effects when possible.
- Maintain editable titles, graphics, and text layers.
- Retain linked design assets, fonts, and relevant source images.
- Avoid flattening or permanently embedding elements that may need replacement unless the production requires it.
Before archiving the project
- Save the final editing project with its required linked assets.
- Keep an accurate script or transcript of the finished video.
- Export separate audio stems if available and useful.
- Preserve a clean master where appropriate.
- Use consistent file names and version labels.
- Store the files in a clear folder structure.
- Back up important materials.
For a simple talking-head video, only a few of these steps may be relevant. For an animated educational series with narration, graphics, and recurring terminology, a more complete archive could save substantial work later. The checklist should support your production process, not slow it down.
Build These Habits into Your Next Video
Understanding how to prepare videos for localization is only the first step. The real benefit comes from making these practices part of your regular production workflow. You might begin by saving a final transcript and organizing the project folder before publishing. On the next video, you could add a clean master export. Later, if you begin producing more complex videos, you might start retaining separate audio stems and terminology notes.
There’s little value in creating an elaborate process that you won’t maintain. The most useful improvements are the ones that fit your content, your tools, and the amount of time you have available. A creator publishing short weekly videos will probably need a lighter system than a team producing a documentary series.
It also helps to remember why you’re saving these materials. The purpose isn’t to anticipate every language or editing request that might arise years from now. It’s to preserve the work you’ve already done so you don’t have to repeat it unnecessarily. When you’re ready to localize, these assets become the starting point for the next stage: preparing the materials for translation, recording, editing, and quality review. If you want to explore how production preparation fits into your wider international content plans, see our video localization guide for content creators.